External Applications
The External Applications section allows you to register and manage third-party integrations that can securely access your device data. Each external application is issued a unique Client ID and Client Secret for authenticated access.
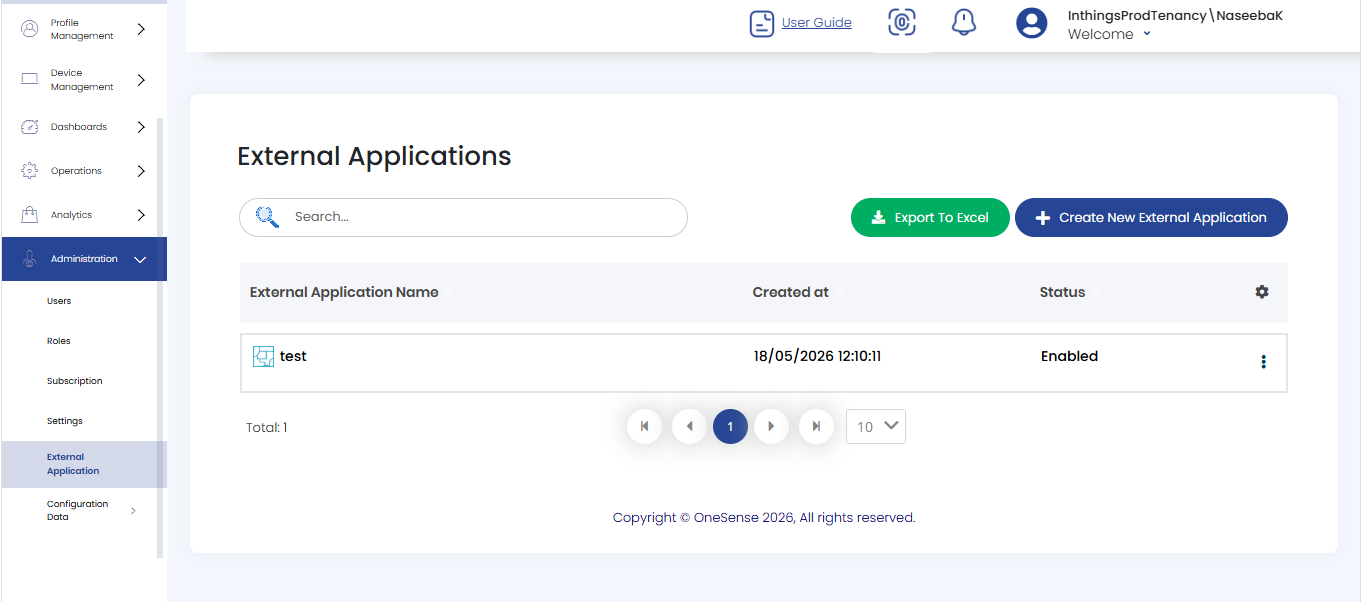
 The External Applications page displays all registered applications in a table with the following columns:
- External Application Name
- Created At – date and time the application was registered
- Status – current state (Enabled / Disabled)
Create New Application
Click the Create New External Application button on the top-right of the page.
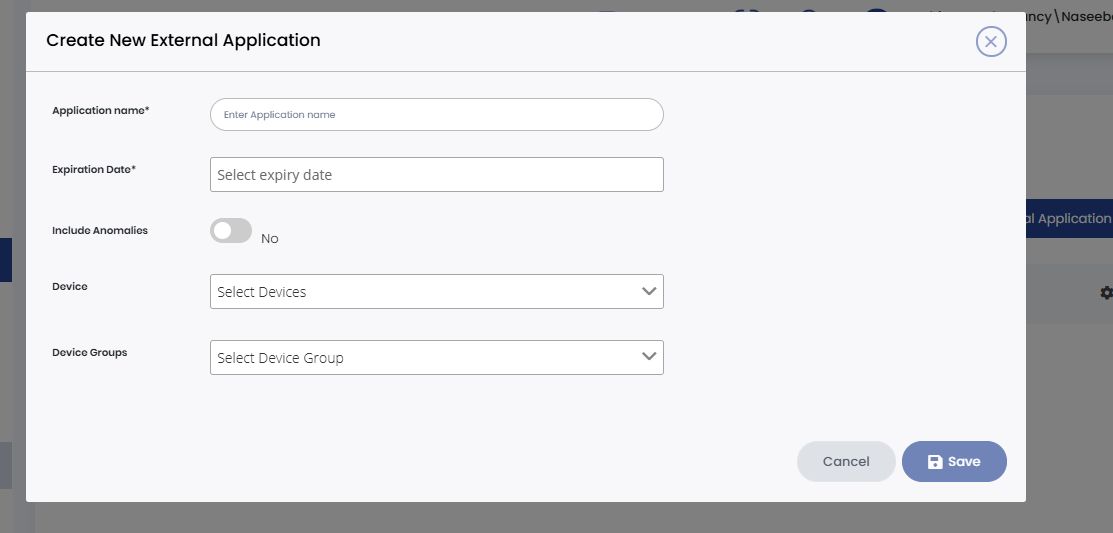
In the creation form, fill in the required fields:
- Application Name – Enter a unique, descriptive name for the external application.
- Expiration Date – Select the date on which the application credentials will expire.
- Include Anomalies - Currently reserved for future functionality
- Device – Select devices whose data the application can access.
- Device Groups – Optionally select a device group to include all devices within it
Click Save to register the application.
Upon successful creation, a confirmation dialog will appear displaying the application credentials:
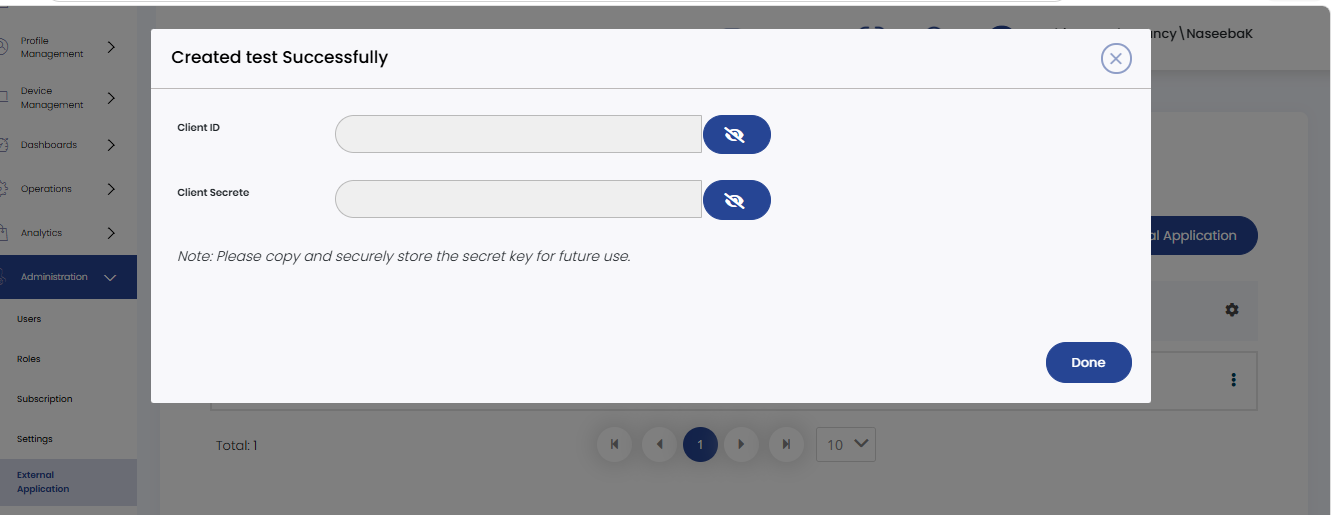
The dialog shows the Client ID and Client Secret for your new application.
Use the eye icon buttons to reveal/hide the values, then copy them to a secure location.
NOTE: Please copy and securely store the secret key for future use. The Client Secret and Client Id will NOT be shown again after you close this dialog.
Click Done to close the dialog. The application will now appear in the list.
Each application in the list has a three-dot menu (⋮) on the right side. Clicking it reveals the following actions:
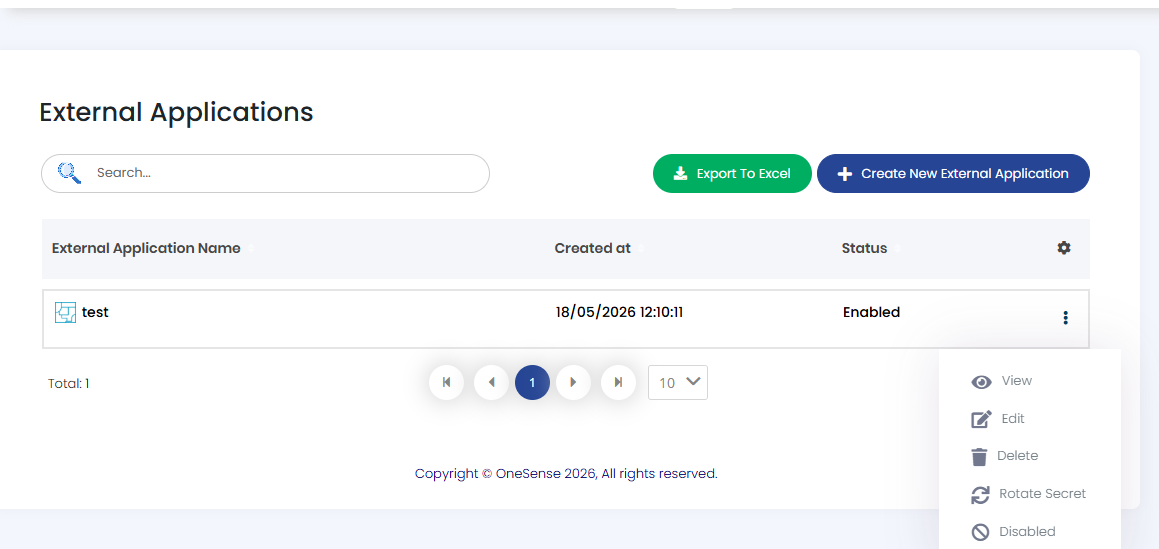
View
Select View from the actions to open the read-only External Application Details.
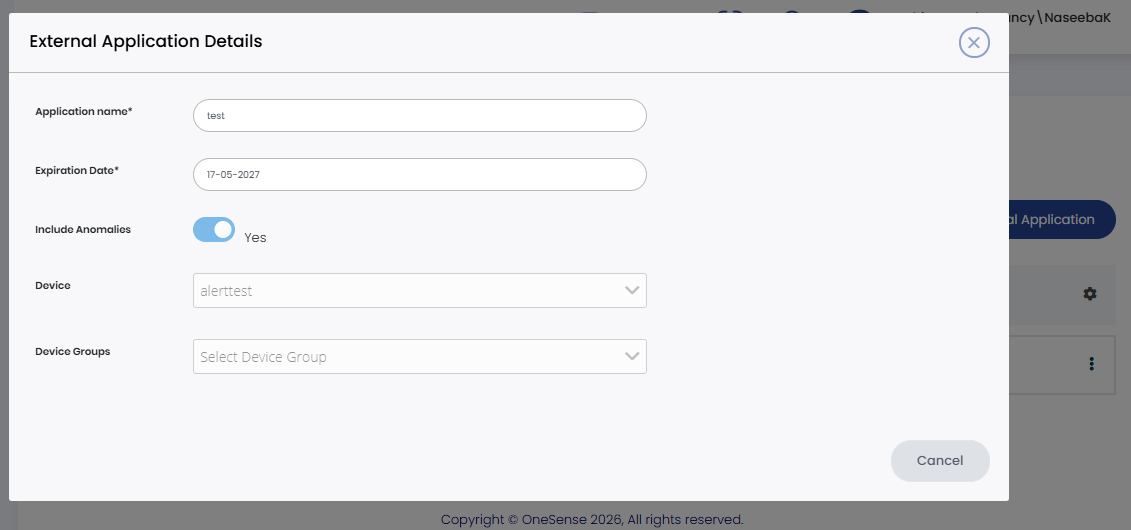
This action displays all configured properties of the application including Application Name, Expiration Date, Include Anomalies setting, selected Device, and Device Groups.
Edit
Select Edit from the dropdown to open the Update External Application Details.
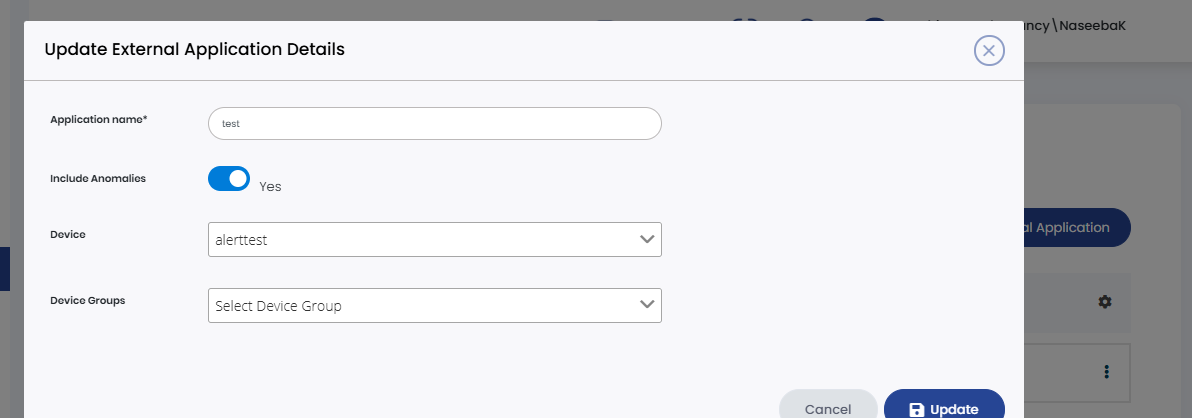
Modify any of the following fields as needed:
- Application Name
- Include Anomalies toggle
- Device selection
- Device Groups selection
Click Update to save your changes, or Cancel to discard them.
Delete
Select Delete from the actions to remove an external application.
Rotate Secret
Select Rotate Secret from the actions to generate a new Client Secret for the application.
A confirmation dialog will appear. Confirm the action to proceed with rotation.
Upon confirmation, the system will generate a new Client Secret and display a success message:
- The dialog will show the Client ID (unchanged) and the new Client Secret
- Use the eye icon to reveal each value, then copy them to a secure location.
Click Done to close the dialog.
Disable / Enable
Select Disabled from the actions to deactivate an active external application.
The application's Status in the list will change from Enabled to Disabled.
API Integration
Once an External Application is created and its credentials are secured, you can use the Client ID and Client Secret to authenticate and stream live device telemetry into any external system — a web page, a Python application, a Grafana dashboard etc
This guide walks through the complete integration process in two steps:
- Step 1 — Obtain an Access Token using your credentials
- Step 2 — Connect to the Streaming Endpoint using that token
Generate an Access Token
Before calling any API endpoint, your application must exchange its Client ID and Client Secret for a Bearer token. This token acts as a temporary pass — it is valid for approximately 60 minutes, after which your application must request a new one.
Token Endpoint:
- Method: POST
- URL: https://onesenseapi.azurewebsites.net/connect/token
- Content-Type : x-www-form-urlencoded
Request Body Parameters
- grant_type: client_credentials (fixed value — always use this)
- client_id: Your application's Client ID
- client_secret: Your application's Client Secret
A 200 OK response contains a JSON object with an access_token field.
NOTE: Access tokens are short-lived (typically 60 minutes). Your application should detect 401 Unauthorized responses and request a fresh token using the same Client Credentials flow.
Testing the Token Request in Postman:
The screenshot below shows a correctly configured token request in Postman. The Body tab is set to x-www-form-urlencoded with all three required fields populated.
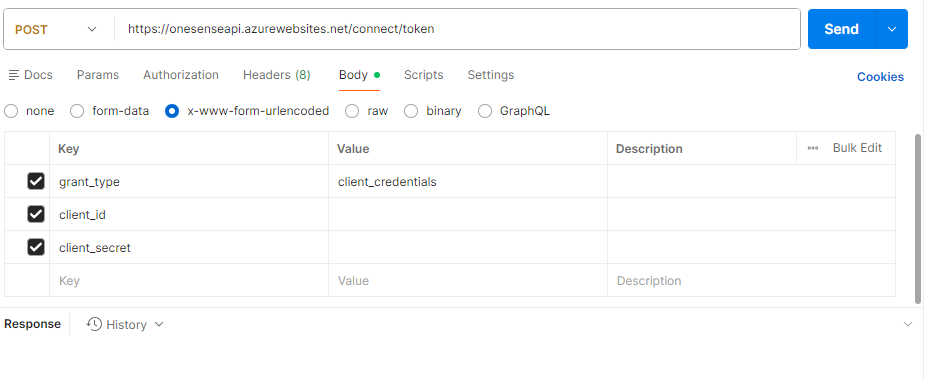
Set the method to POST and enter the token URL.
Under the Body tab, select x-www-form-urlencoded.
Add the three key-value pairs: grant_type, client_id, and client_secret.
Click Send. A 200 OK response means the token was issued successfully.
Connect to the Streaming Endpoint using that token
The telemetry streaming endpoint uses Server-Sent Events (SSE). Once connected with a valid Bearer token, the server pushes device data in real time as events arrive
Server-Sent Events (SSE) is a streaming technology that allows the server to continuously send real-time updates to a connected client over a single HTTP connection.
Streaming Endpoint:
- Method: GET
- URL: https://onesenseapi.azurewebsites.net/v1/stream/telemetry
- Accept : text/event-stream
- Auth : Bearer
What Happens When You Connect
- Your application opens an HTTP GET request to the streaming URL, passing the Bearer token in the Authorization header.
- The server validates the token signature and reads the embedded claims — specifically the tenant ID, device IDs.
- The server returns HTTP 200 with Content-Type: text/event-stream, keeping the connection open (no response body closes immediately).
- As telemetry data arrives from your permitted devices, the server pushes each reading as a text/event-stream event down the open connection.
- Your application reads events in a loop. Each event is a JSON payload you can parse and display.
- The stream continues until the token expires, the device goes offline, or your application closes the connection.
Display the Live Data
Once connected, your application receives a continuous stream of JSON events. The examples below show how to integrate the stream in two common environments: a browser-based HTML page and a Python backend service.
Example: Python Script
The streaming API can be integrated with Python scripts to receive and display live telemetry data.
User Provides Application Credentials like Client ID and Client Secret. These credentials are generated when the External Application is created in OneSense.
The Python script sends a request to the token endpoint using the provided Client Credentials.
The authentication server validates the credentials and returns:
- Access Token
- Token expiration details
The Access Token is then used for authenticating streaming requests.
After generating the Access Token, the Python application connects to the telemetry streaming endpoint.
Once connected:
- The connection remains active
- The server continuously pushes telemetry updates
- The Python application receives events in real time
Python Dependencies:
- requests: Handles HTTP API communication
- sseclient: Reads Server-Sent Events (SSE) streams
- json: Parses telemetry JSON payloads
How the Script Works:
- Open a terminal or command prompt in the project directory.
- Run the Python script using the following command: py projectfilename.py
- The application prompts for the Client ID and Client Secret.
- After entering valid credentials, the application generates an Access Token and connects to the telemetry stream.
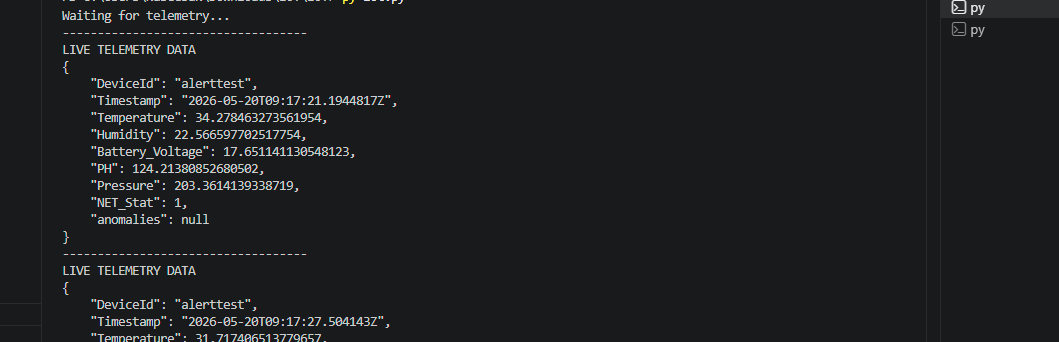
- Once the device starts sending telemetry, the console continuously displays live telemetry events in JSON format


Example: HTML Web Page
You can build a simple real-time dashboard directly in an HTML page using JavaScript.
The web application first sends a request to the token endpoint using the External Application credentials:
- grant_type: client_credentials (fixed value — always use this)
- client_id: Your application's Client ID
- client_secret: Your application's Client Secret
Server validates these credentials and returns a short-lived Bearer Access Token.
This token is required for accessing telemetry streaming endpoint.
Once the Access Token is generated, the application connects to the telemetry streaming endpoint using the Bearer token.
The streaming API uses Server-Sent Events (SSE), which allows the server to continuously push telemetry updates to the connected application.
After the connection is established:
- The connection remains open
- The server continuously streams telemetry events
- Device readings are delivered in real time
- The application can immediately display or process incoming data
Browser and SSE Support:
- The telemetry streaming API uses Server-Sent Events (SSE) for real-time communication.
- Most modern browsers support SSE connections, allowing web applications to receive streaming telemetry updates efficiently.
Device Access Control:
The streaming API only returns telemetry data for devices that the External Application is authorized to access. When the Bearer token is validated:
- The tenant information is extracted from token claims
- Authorized device permissions are verified
- Only permitted telemetry data is streamed to the application
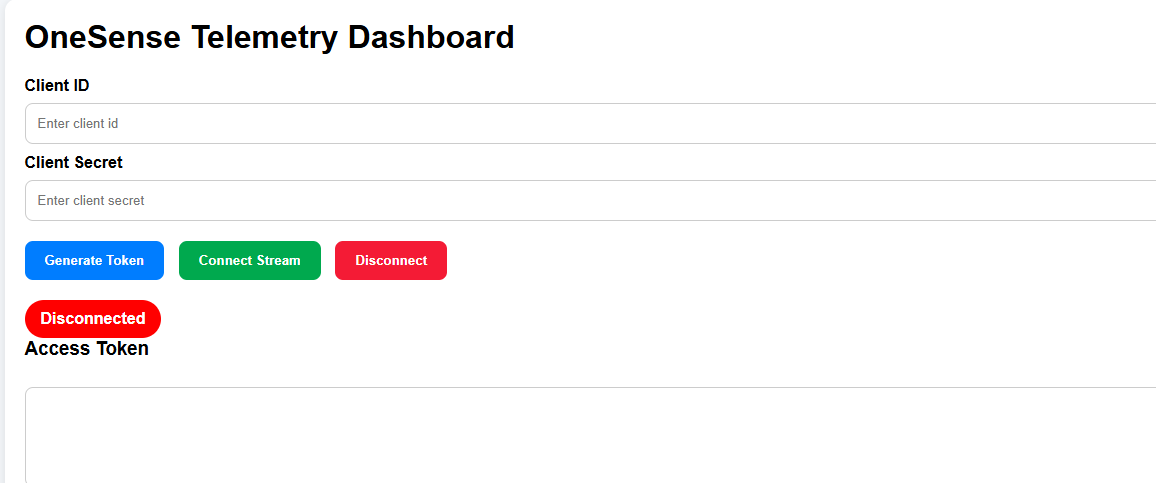
How to Run the HTML Web Application:
- Open the project folder in Visual Studio Code or any code editor.
- Open a terminal in the project directory and run the following command to start the Node.js backend server: node server.js
- Next, open the HTML file using Live Server or any local web server.
- The telemetry dashboard UI opens in the browser.
- Enter the Client ID and Client Secret generated from the External Application.
- Click Generate Token to request an Access Token from the OneSense authentication API.
- After successful authentication, the generated Bearer token is displayed in the Access Token section.
- Click Connect Stream to establish the telemetry streaming connection.
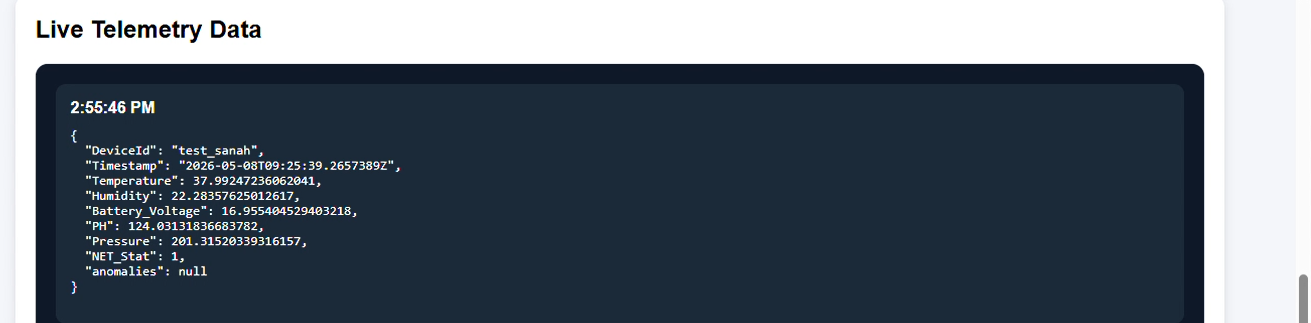
- Turn on the authorized device or start sending telemetry data from the device.
- As telemetry events arrive, the dashboard displays live JSON telemetry data in real time.
Security Recommendations
- Never expose the Client Secret in public applications or repositories.
- Store credentials securely using environment variables or secret management tools.
- Use HTTPS for all API communication.
- Rotate Client Secrets periodically for improved security.